_7i7o, piablo @ Developer_DAO
October 15, 2023
Twitter @7i7o.eth, @Skruffster
Created by:
Avatar_7i7o, piablo @ Developer_DAO
October 15, 2023
Twitter @7i7o.eth, @Skruffster
If you're eager to learn how to create your first ERC-20 token, you're in the right place. There are a multitude of uses for the ERC-20, and we'll introduce you to some of them. We'll be building a smart contract with a range of developer tools, including the use of Foundry. If you are new to coding, we suggest that you first complete our Getting Started with Smart Contract Development project, to get to grips with the basics of Solidity you'll need in this lesson. And then move on to Build a Basic NFT where you can get familiar with using an IDE, wallet, RPC, testnet and Etherscan, all of which you'll be using here to some degree. We also have a series of follow-up projects 'in the works' to follow on from this tutorial, but let's get our focus on this one first.
We'll have checkpoint questions at stages for testing your previous knowledge, predicting next steps in the lesson, and helping you see how you're absorbing the new content. You can also expect a final quiz, so make sure you're checking out any additional material here for a deeper dive of the new concepts. To complete the lesson, expect somewhere between one and three hours, depending on your previous experience and the need to learn new ideas. Let's make learning enjoyable by taking care of our well-being. We have a pomodoro timer ⌛ for you in the menu header. Make use of it to take regular breaks, and please do go outside and "touch grass." 😊 Nature is the source of much of our well-being. 🌱
By the end of this lesson you will have created your own ERC-20 token, and you will be able to change its properties in any way you need. But before we go any further, let's check-in and see what building blocks you have already.
We hope that was a little eye-opener for what's to come!
Let's begin with some context, so we all speak the same language. The Ethereum blockchain, and most EVM-compatible blockchains, have a native token that is used to pay for transaction costs, and also to reward validators in Proof of Stake (previously miners in Proof of Work). In Ethereum that native token is Ether, or ETH, in Polygon its POL, and so on. But let's focus on the Ethereum blockchain for the sake of clarity.
Every other token or 'crypto' you see, use or interact with on Ethereum is basically a smart contract that lets you send these tokens, receive them and check your balance. Stablecoins like DAI, Tether (USDT), USD Coin (USDC), or tokens from projects like Uniswap (UNI), MakerDAO (MKR), Basic Attention Token (BAT) are all smart contracts that follow a standard. The ERC-20 standard.
A lot of reasons, but here are some. The most fundamental one is that we are learning, and want to know how the ecosystem works. Or we have a project, or DAO that needs some means of governance, or a community that wants take some ownership, be part of, or simply support our project. Maybe we need a token with extra functionality that doesn't even exist yet. The possibilities are endless!
Some basic functionality that our tokens need to provide are:
Has someone created a battle-tested library for the standard? Yes. OpenZeppelin, among others, has created an implementation we can inherit to create our own tokens easily. Here is a quick overview of what a contract needs in order to be called an ERC-20 Token contract:
Before we start hacking away without any structure to follow, what is our actual project's structure, and what do we want to achieve? Since we are BUIDLING, I'd like to think of our project, or smart contract, roughly the same way as we would build a house:
Before we build, we need a stable, levelled surface to place our foundations so we can build on top. The tools for coding and the project's file/folder structure will be our foundations.
Before coding our basic contract, we need to create a project and set up our IDE to code. Let's go into the folder where we store all our Academy projects:
## (OPTIONAL) create a folder for our D_D Academy projects
mkdir d_d_academy
cd d_d_academy
You can use whatever tools you feel confident with, or accustomed to. For this example we will be creating a Foundry project, but feel free to use Hardhat, or Truffle if that's your favourite flavor. The main focus of Foundry is that you don't need to use Javascript at all, if you don't want to. All the tools are CLI commands. For tests and scripts, you only need Solidity!
These instructions are for Linux and MacOS. If you use Windows, we strongly recommend using WSL (Windows Subsystem for Linux), or else you'll need to build the tools from source. Using WSL is an investment in the long term anyway, since most development and Open Source work is done inside Unix environments. We encourage you to try it. There is also a Docker container if you prefer it. All options are detailed in the Foundry Book
To download Foundry, we need to run this command on the console:
curl -L https://foundry.paradigm.xyz | bash
This will download and install the
Now let's run this tool to install the Foundry toolkit:
foundryup
If everything goes well, you'll have four tools to run in the console:
Now we can create our project with:
forge init my_token
Let's see what our project looks like:
cd my_token
tree . -d -L 1
This command outputs something like this:
.
├── lib
├── script
├── src
└── test

4 directories
The folders in our project are used like this:
The default project includes a basic smart contract. We can build it to see how the
forge build
My output:
[⠒] Compiling...
[⠔] Compiling 22 files with 0.8.20
[⠃] Solc 0.8.20 finished in 4.35s
Compiler run successful!
And now we can test it:
forge test
My output:
[⠆] Compiling...
No files changed, compilation skipped

Running 2 tests for test/Counter.t.sol:CounterTest
[PASS] testFuzz_SetNumber(uint256) (runs: 256, μ: 27631, ~: 28409)
[PASS] test_Increment() (gas: 28379)
Test result: ok. 2 passed; 0 failed; 0 skipped; finished in 27.32ms

Ran 1 test suites: 2 tests passed, 0 failed, 0 skipped (2 total tests)
As we mentioned earlier, we are going to use OpenZeppelin ERC-20 implementation. To use it, we need to install OpenZeppelin as a dependency in our project. To install dependencies in Foundry, we use:
forge install OpenZeppelin/openzeppelin-contracts
This looks for the repo called
This is the output I got:
Installing openzeppelin-contracts in /home/myuser/d_d_academy/my_token/lib/openzeppelin-contracts (url: Some("https://github.com/OpenZeppelin/openzeppelin-contracts"), tag: None)
	...
	Installed openzeppelin-contracts v5.0.0
This lets us import OpenZeppelin contracts in our smart contracts. We need to create a
forge remappings > remappings.txt
echo "@openzeppelin/=lib/openzeppelin-contracts/" >> remappings.txt
This tells
Now that we have an overview of the tools and the OpenZeppelin's libraries installed, we can clean up the files we won't use and start afresh:
rm script/*
rm src/*
rm test/*
Everything's ready, so let's go ahead and start coding Solidity.
We need our house to have a structure and a floor plan with walls dividing the rooms. Let's think of that setting as the 9 methods and 2 events that we saw earlier for our code to be ERC-20 compliant.
It's a great exercise to try and implement them from scratch, and we ecourage you to do that once you start diving deeper into Solidity. It is also a great challenge to do it, and later compare your code to battle-tested code like OpenZeppelin's implemetation.
In this lesson we'll start by inheriting OZ's, and then choose the specifics that our token needs.
Let's start by creating a
// SPDX-License-Identifier: MIT
pragma solidity 0.8.20;

contract MyToken {
}
Once we have that, we can import and inherit OpenZeppelin ERC-20:
// SPDX-License-Identifier: MIT
pragma solidity 0.8.20;

import "@openzeppelin/contracts/token/ERC20/ERC20.sol";

contract MyToken is ERC20 {
}
Now that we have the full implementation inherited, we still have to specify a few more things before compiling, because the ERC-20 constructor needs to receive 2 parameters, i.e. the token's name and symbol, or it will raise an error. In order to do that, we define our constructor and call our inherited contract's constructor:
// SPDX-License-Identifier: MIT
pragma solidity 0.8.20;

import "@openzeppelin/contracts/token/ERC20/ERC20.sol";

contract MyToken is ERC20 {
    constructor() ERC20("MyToken", "MTK") {}
}
With those few lines, we inherit all the functions and events we need.
One final consideration is adding a roof above ourselves, to be able to live in and finish the structure around us. We have all the rooms and functions we needed, but no tokens exist yet. What good is a house with no roof, or a token with no supply? We can think of the initial allocation of tokens as the way to put a roof on the house and finish the structure. If you choose not to have an initial allocation, that's also valid and can skip this, but for our example we'll allocate an arbitrary amount of tokens to the deployer of the contract on our constructor:
// SPDX-License-Identifier: MIT
pragma solidity 0.8.20;

import "@openzeppelin/contracts/token/ERC20/ERC20.sol";

contract MyToken is ERC20 {
    constructor(uint256 initialAllocation) ERC20("MyToken", "MTK") {
        _mint(msg.sender, initialAllocation);
    }
}
The internal function
We now have a full structure, with a roof to shelter us from the weather. The only problem is that we didn't create any openings for anyone to enter or leave. We can think of entering the house as
If you are planning on leaving a fixed total supply like the
We need to create public facing functions to achieve this:
// ... pragma + import lines

contract MyToken is ERC20 {
    // ... constructor lines

    function mint(address to, uint256 amount) public {
        _mint(to, amount);
    }

    function burn(uint256 amount) public {
        _burn(msg.sender, amount);
    }

    // In case we have allowance from other address to transfer/burn their tokens:
    function burnFrom(address from, uint256 amount) public {
        _burn(from, amount);
    }
}
When we define our
In a special case where someone approves operating on an amount of their tokens, we create a
We have now created doors to our house, but we haven't put locks in them!
In our present state, our functions for minting and burning can be called by any address. That's ok for
To be able to limit the access to minting tokens, we are going to use an OpenZeppelin pattern called AccessControl to give granular access to functionality within our code. For that we will inherit yet another great contract from the OZ library. It basically lets us define roles and assign or un-assign them to any address we need. In our case, we will only create a
// ... pragma + import lines

import "@openzeppelin/contracts/access/AccessControl.sol";

contract MyToken is ERC20, AccessControl {

    bytes32 public constant MINTER_ROLE = keccak256("MINTER_ROLE");

    constructor(uint256 initialAllocation) ERC20("MyToken", "MTK") {
        // Allow msg.sender to grant roles
        _grantRole(DEFAULT_ADMIN_ROLE, msg.sender);

        // Grant MINTER_ROLE to msg.sender
        _grantRole(MINTER_ROLE, msg.sender);

        _mint(msg.sender, initialAllocation);
    }

    function mint(address to, uint256 amount) public onlyRole(MINTER_ROLE) {
        _mint(to, amount);
    }

    // ... burn functions

}
Let's break down our changes in the code:
So, we basically imported
Now any address that doesn't have the
Congratulations! We have built a fully functioning token!
Given that we have our house completed, you might want to add some personalized detail to it, like special furniture, wall paint, or make it a smart home.
With this in mind, we can add functionality to our token, in any non-standard fashion. We are not going to cover any modifications to our code here, but we strongly encourage you to be bold, creative and experiment with different aspects for the token.
A few examples could be:
The possibilities are endless, and we want you to go wild with your imagination.
Before we go to the Real Estate Register, we need to make sure everything is working according to your local rules, so let's call an inspector to see if we got everything right.
In our analogy, the inspector will be the Solidity compiler. Later on, when we have more dexterity in this new realm we'll be adding tests to make sure everything is spot on, but that's for another lesson.
Since we layed out our project using Foundry, we only need to step into our project's folder and run one command:
forge build
Here's what I got in the console:
[⠢] Compiling...
[⠒] Compiling 10 files with 0.8.20
[⠑] Solc 0.8.20 finished in 252.16ms
Compiler run successful!
Everything compiled successfully and is ready to deploy.
If you have any problems here, since the compiler might have found some typos or errors in your code, pay attention to the messages in the console and see if you can find and fix them. If you can't fix them, you can go into our forum and try to ask our community for help by explaining your error, the console output and your configuration (OS, version, Foundry and Solidity version, etc.)
Or... Let's deploy our contract!
Now that we have our house built, we need to register it so as to guarantee the property rights. We can think of this as deploying our contract to a blockchain, where our token will be fully functioning for every address that wants to interact with it.
We are going to need a small amount of Sepolia ETH to be able to pay for the transaction to deploy our contract. If you already have some Test ETH in Sepolia, you can continue, if you don't you can always ask for some in the many faucets that are online. Some options are: Alchemy, Sepolia Faucet or Quicknode, but you can find more if you search for Sepolia Faucet in any search engine.
We are going to create an
So, with that important notice out of the way, we create a new file in our project's root folder called
RAW_PRIVATE_KEY=REPLACE_THIS_VALUE_WITH_YOUR_PRIVATE_KEY
ETH_RPC_URL=https://rpc.ankr.com/eth_sepolia
CHAIN=sepolia
ETHERSCAN_API_KEY=REPLACE_WITH_ETHERSCAN_API_KEY
Remember to replace the
Overview of our values:
Once we have these values inside the file, we can source it to have the values as enviroment variables before using Foundry's deploy tools.
There are many ways to load these values into environment variables, depending on which shell you use e.g. Bash, zsh, fish... The next command works with most of bash-compatible shells:
export $(grep -v '^#' .env | xargs)
If you are using Fish or another shell, you can search on how to create a function that does the same. Tip: envsource fish function.
Once we have those values in our environment, our Foundry tool to deploy will know which wallet to deploy from, node or RPC in the blockchain to connect to, and chain we want to deploy to.
Remember that if you close your terminal session, all these variables with your private keys gets wiped from memory, so you need to run this command again if you want to continue the lesson at a later date.
We also need to pass our constructor 1 argument, our token's initial allocation. All the Foundry tools expect values to be passed in
cast --to-wei 1000
My output:
1000000000000000000000
Now we can use this value when we need to deploy. To deploy our contract we will use the
We don't have to copy our private key in the command! That's one of the reasons to use the
We can even delete the private key after we deploy the contract. If you write your private key in a command on the terminal, it gets stored in the terminal's history, which could be in a publicly accesible file in your computer. That's why we are using an
Notice aside, this is the command we can use to finally deploy our contract:
forge create src/MyToken.sol:MyToken \
    --constructor-args 1000000000000000000000 \
    --verify \
    --private-key $RAW_PRIVATE_KEY
Remember that if you used a different name for your token and your
Do you see how we used the value that
We also used
This is the output I got:
[⠊] Compiling...
No files changed, compilation skipped
Deployer: 0xf4bAFA90241e808461653C17dB0f8669Fa4342a1
Deployed to: 0xec870005029ED5595F146f6AAAe699b442065b72
Transaction hash: 0x436120f627b1b56ac92ca1df408f1ec591cd578c4168aad4d89bc73c4141aa78
Starting contract verification...
Waiting for etherscan to detect contract deployment...
Start verifying contract `0xec870005029ED5595F146f6AAAe699b442065b72` deployed on sepolia

Submitting verification for [src/MyToken.sol:MyToken] "0xec870005029ED5595F146f6AAAe699b442065b72".
Submitted contract for verification:
        Response: `OK`
        GUID: `hzmpq14eeasu92sd1hgzgdhttdu7iscirjlbs9eb1vsezkn8vc`
        URL:
        https://sepolia.etherscan.io/address/0xec870005029ed5595f146f6aaae699b442065b72
Contract verification status:
Response: `NOTOK`
Details: `Pending in queue`
Contract verification status:
Response: `OK`
Details: `Pass - Verified`
Contract successfully verified
If by chance you get a message saying Etherscan hasn't detected or verified the deployment, try running the command again.
By filtering through the information, we can pay attention to the second line, where the tool tells us the address of the deployed contract:
You can go into Sepolia Etherscan block explorer and search for the address that the command returned to check out your very own newly deployed smart contract!
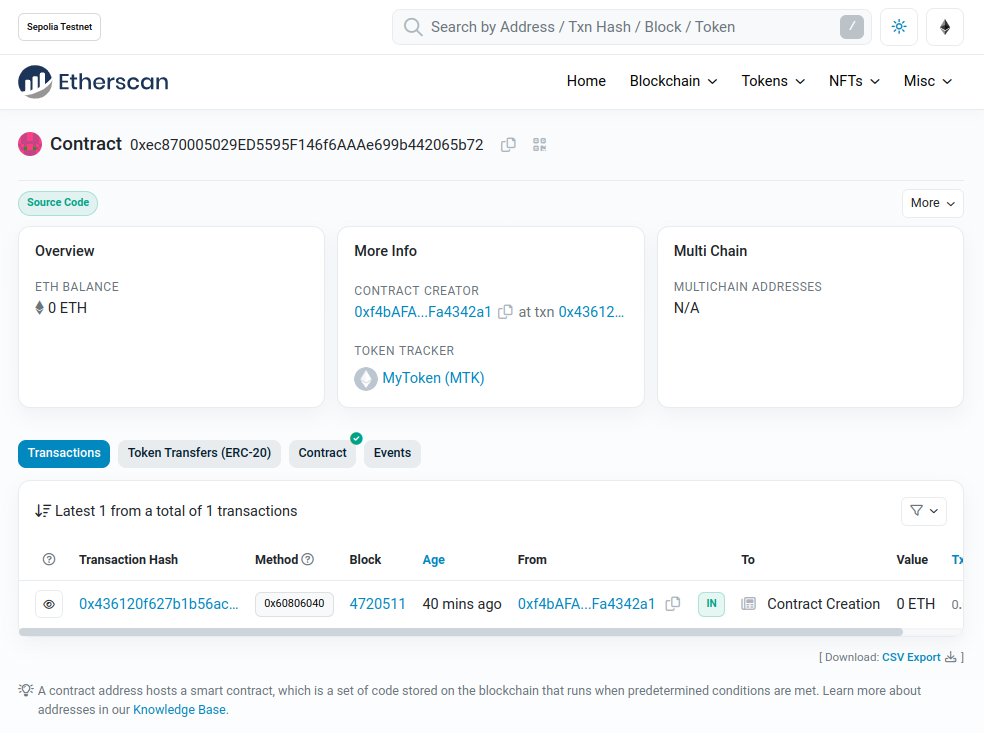
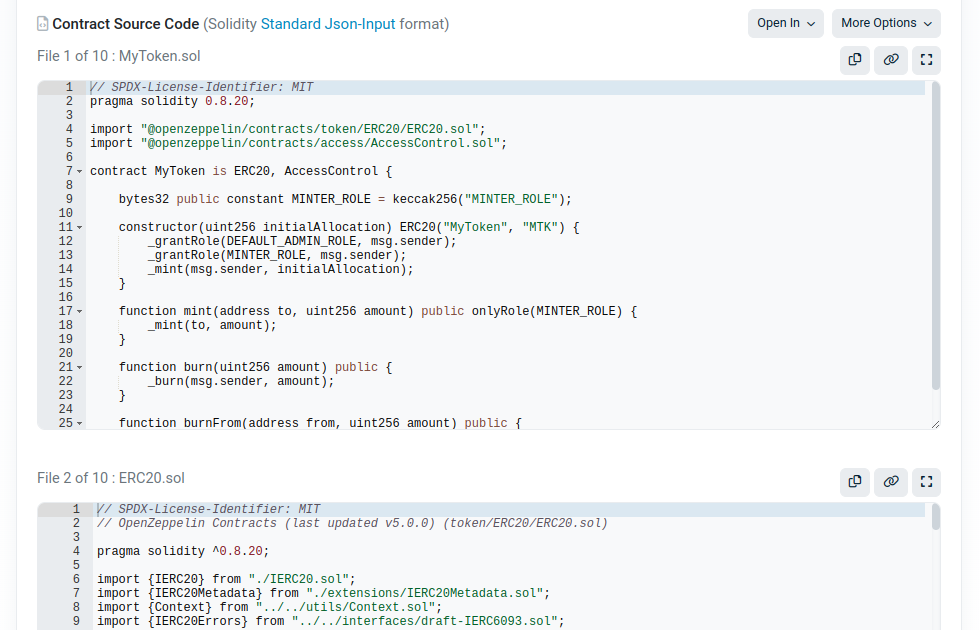
If you got to verify it, you will also get a link to see your contract on the block explorer. In our case, it's the last line of the Submitted contract for verification section of the terminal output Sepolia Etherscan. And you get to see the code for the contract and all its libraries right there in the tab named Contract with the green checkmark.
If you scroll down, you'll see our code. It was the first file of the set for me:
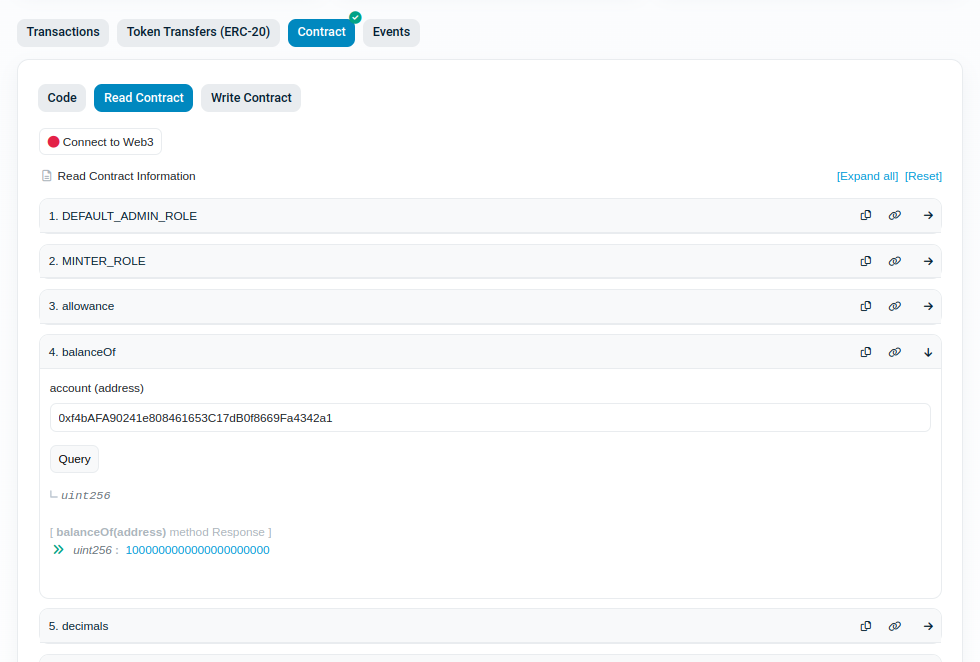
Etherscan also gives you a front-end to easily interact with the contract. Inside our contract tab, you get 3 tabs: Code, Read Contract and Write Contract.
We can go and check for our balance by clicking in the Read Contract tab, and then searching for the

Copy and paste your wallet's address - the one you used to deploy the contract, and click Query. You should have as many wei as you passed to the constructor when deploying. In my case it was 1000000000000000000000 wei and since we left our decimals in 18, that would be exactly 1000 MTK.
That's it! We deployed our contract on the Sepolia testnet, and our token should be live and kicking. Now that we have built our house and it's has been accepted in the real estate register, we can invite our friends by transferring them some MTK, or maybe minting them some tokens, even if that affects your tokenomics 😉
Let's take one more moment to consolidate the steps you've just mastered:
All in all, a very significant accomplishment!
So where do you go from here? In the future, we'll be adding to this ERC-20 series of lessons. But for now, why not explore A Developer's Guide to Ethereum three part track throught the lens of Python? Or complete the NFT track, all the way from the back-end to creating your own front-end, building your own Test Driven Development suite along the way. And of course, we have lots of other goodies in the pipeline to get your developer juices flowing.
And make sure to check into the Developer_DAO community for our newsletter, workshops, DevNtells, hackathons, VIBES and many more initiatives that are going to enhance your developer journey in creating a better planet Earth with us 🌎🌤️💦🌈🌊