_7i7o, meowy, piablo @ D_D Academy
August 30, 2022
Twitter @7i7o, @Skruffster
Created by:
Avatar_7i7o, meowy, piablo @ D_D Academy
August 30, 2022
Twitter @7i7o, @Skruffster
Welcome to this tutorial, where you will learn how to create tiered NFTs using Solidity smart contracts and expand the capabilities of your NFT projects. This tutorial builds upon the knowledge gained from our previous Getting Started with Smart Contract Development and Build a Basic NFT lessons. If you haven't already, we recommend you complete them to familiarise yourself with the fundamentals of Solidity and the concepts we will be building upon in this lesson.
Throughout this tutorial, we will provide you with checkpoint questions to test your previous knowledge, predict upcoming steps in the lesson, and allow you to gauge how well you are soaking up the new content. Be sure to check out all the side-drawers for a deeper dive into the concepts, as there will be a quiz at the end of the lesson. We estimate between one and six hours to complete the lesson, depending on your previous experience and your need to learn new ideas. Remember to take regular breaks and enjoy the process of development. We even have a pomodoro timer ⌛ in the menu header to help you pace yourself and remind you to "touch grass" and appreciate nature's contribution to our well-being. 🌱
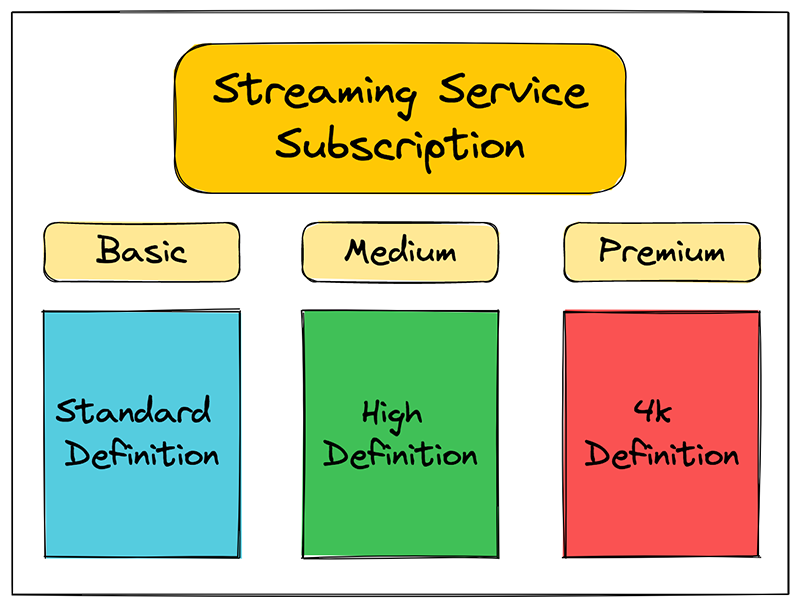
In the previous lesson, we talked about NFTs and their use cases. Unlike traditional NFTs that may represent a single unique use-case, such as a login to a web page, or access to a service, tiered NFTs introduce a hierarchy of functionality, e.g. differentiating between different categories of a service. Think of some streaming services out there such as Netflix, or Disney+ and the different levels of access the subscription offers. By assigning tiers to different levels of rarity or attributes, we can create a more dynamic and engaging NFT ecosystem. This opens up new possibilities for collectors, artists, and many other interested parties. In this project, we will create a tiered NFT smart contract that will serve as a foundational framework for a variety of your future NFT ventures, unlocking a multitude of possibilities. That's pretty rad!
Let's pause here for a few questions to give you a taste of what's to come, and remind, or check yourself on some prior knowledge.
How did that go? No pressure if there were some gaps. We're here to bridge them together! ⌛ And have you set your pomodoro yet? 😊 🌱
Now that we have set the stage, it's time to dive into the exciting world of tiered NFTs and uncover the unique superpowers they possess. By the end of this tutorial, you will have gained a wealth of knowledge and accomplished the following steps:
Throughout this journey, we will leverage a range of developer tools and open accounts to transition seamlessly between different development environments. These tools include:
We will guide you through each step, ensuring a fun and comprehensive learning experience. Let's get started on this exciting journey into the world of tiered NFTs, and unleash the endless possibilities they hold!
Before we start coding, we need to create our project template by following the same steps as in the previous Build a Basic NFT lesson. Make a note of these steps and what they do, for you will use them a lot in the future. Using
Let’s first open a console and
npx hardhat init */}
## (OPTIONAL) create a folder for our D_D Academy projects
mkdir d_d_academy
cd d_d_academy

## create a folder for this project
mkdir tierNFT
cd tierNFT

## initialize our folder as an npm package
npm init -y

## install hardhat (and its dependencies)
npm install --save-dev hardhat

## create a Hardhat project
npx hardhat init
The
Choose
✔ What do you want to do? · Create a JavaScript project
✔ Hardhat project root: · ~/d_d_academy/tierNFT
✔ Do you want to add a .gitignore? (Y/n) · y
✔ Do you want to install this sample project"'"s dependencies with npm (@nomicfoundation/hardhat-toolbox)? (Y/n) · y
The project asked us to install
npm install --save-dev hardhat @nomicfoundation/hardhat-toolbox
In a Hardhat project, some of the default folders are:
We want to delete the default files inside the folders so we start afresh, i.e. we will create our own .sol file for our own contract, etc:
rm contracts/*.sol
rm scripts/*.js
rm test/*.js
We now need to add our last dependency. The OpenZeppelin contracts:
npm install @openzeppelin/contracts
OpenZeppelin is best known for implementing freely available contracts for various standards. They are powerful and widely used building blocks for Solidity developers, and come fully tested and audited.
Fire up your code editor and let’s start hacking. I’m using VSCode, so I just need to run
Let’s create an empty file named
// SPDX-License-Identifier: MIT
pragma solidity 0.8.12;

contract TierNFT {
}
Now that we have our license, Solidity version and the contract defined, we can add the logic and the variables we need to store. As we are creating tiers for the categories of our NFTs, we need to also store information about tiers in our contracts. We'll write our smart contract step by step in five stages:
Let’s get started by inheriting OpenZeppelin's
// SPDX-License-Identifier: MIT
pragma solidity 0.8.12;

import "@openzeppelin/contracts/token/ERC721/ERC721.sol";

contract TierNFT is ERC721 {

    constructor(string memory _name, string memory _symbol)
        ERC721(_name, _symbol) {}

}
Now let’s go ahead and add a mint function which will call
// SPDX-License-Identifier: MIT
pragma solidity 0.8.12;

import '@openzeppelin/contracts/token/ERC721/ERC721.sol';

contract TierNFT is ERC721 {

    uint256 public totalSupply;

    constructor(string memory _name, string memory _symbol)
        ERC721(_name, _symbol) {}

    function mint() public payable {
        totalSupply++;
        _safeMint(msg.sender, totalSupply);
    }

}
Next, to make our code neat and easily readable, just before the contract declaration add the tier NAME and VALUE state variables, and assign their values, where each one represents a service subscription. Note that we assign the
// SPDX-License-Identifier: MIT
pragma solidity 0.8.12;

import "@openzeppelin/contracts/token/ERC721/ERC721.sol";

string constant TIER_NAME_0 = "Basic";
string constant TIER_NAME_1 = "Medium";
string constant TIER_NAME_2 = "Premium";
uint256 constant TIER_VALUE_0 = 0.01 ether;
uint256 constant TIER_VALUE_1 = 0.02 ether;
uint256 constant TIER_VALUE_2 = 0.05 ether;

contract TierNFT is ERC721 {

    uint256 public totalSupply;
    mapping(uint256 => uint256) public tokenTier;

    constructor(string memory _name, string memory _symbol)
        ERC721(_name, _symbol) {}

    function mint() public payable {
        totalSupply++;
        _safeMint(msg.sender, totalSupply);
    }

    // We will add more code here

}
We have added
Now we need to modify the mint function with logic that can access the three NFT tiers separately. We use a conditional
    // state variables and contract definition...

    uint256 public totalSupply;
    mapping(uint256 => uint256) public tokenTier;

    // constructor...

		function mint() public payable {
        require(
            msg.value >= TIER_VALUE_0,
            "Not enough value for the minimum Tier"
        );

        uint256 tierId = 0;
        if (msg.value >= TIER_VALUE_2) tierId = 2;
        else if (msg.value >= TIER_VALUE_1) tierId = 1;

        totalSupply++;
        _safeMint(msg.sender, totalSupply);
        tokenTier[totalSupply] = tierId;
    }

		// We will add more code here
}
The mint function selects tiers based on the amount of native token it receives stored in
The
We already have two
// SPDX-License-Identifier: MIT
pragma solidity 0.8.12;

import "@openzeppelin/contracts/token/ERC721/ERC721.sol";

string constant TIER_NAME_0 = "Basic"; string constant TIER_NAME_1 = "Medium";
string constant TIER_NAME_2 = "Premium"; uint256 constant TIER_VALUE_0 = 0.01
ether; uint256 constant TIER_VALUE_1 = 0.02 ether; uint256 constant TIER_VALUE_2
= 0.05 ether;

contract TierNFT is ERC721 {

    uint256 public totalSupply;
    mapping(uint256 => uint256) public tokenTier;

    constructor(string memory _name, string memory _symbol)
        ERC721(_name, _symbol) {}

    function mint() public payable {
        require(
            msg.value >= TIER_VALUE_0,
            "Not enough value for the minimum Tier"
        );

        uint256 tierId = 0;
        if (msg.value >= TIER_VALUE_2) tierId = 2;
        else if (msg.value >= TIER_VALUE_1) tierId = 1;

        totalSupply++;
        _safeMint(msg.sender, totalSupply);
        tokenTier[totalSupply] = tierId;
    }

}
⌛ Pomodoro? 😊 🌱
When we inherited OpenZeppelin's
// Place this under the other imports at the top:
import "@openzeppelin/contracts/utils/Base64.sol";
import "@openzeppelin/contracts/utils/Strings.sol";
Next, we import
For this lesson we won’t be creating a separate JSON file. We will actually code it into the contract! Nifty, eh?
    // mint function part of the code...

    // Create the tokenURI json here, instead of creating files individually
    function tokenURI(uint256 tokenId)
        public
        view
        virtual
        override
        returns (string memory)
    {
        require(_exists(tokenId), "Nonexistent token");

        string memory imageSVG = "PLACEHOLDER FOR SVG IMAGE";

        string memory json = Base64.encode(
            bytes(
                string(
                    abi.encodePacked(
                      '{"name": "', name(), " #", Strings.toString(tokenId),
                      '", "description": "TierNFTs collection",'
                      '"image": "data:image/svg+xml;base64,',Base64.encode(bytes(imageSVG)),
                      '"}'
                    )
                )
            )
        );

        return string(abi.encodePacked("data:application/json;base64,", json));
    }

		// We will add more code here
}
Let’s stop to break it down and examine it a little.
This is the JSON format of our metadata:
'{"name": "', name(), " #", Strings.toString(tokenId),
'", "description": "TierNFTs collection",'
'"image": "data:image/svg+xml;base64,',Base64.encode(bytes(imageSVG)),
'"}'
The
{
	"name": "TierNFT #3",
	"description": "TierNFTs collection",'
	"image": "data:image/svg+xml;base64,A_BUNCH_OF_BASE64_LETTERS_AND_NUMBERS_HERE"
}
// SPDX-License-Identifier: MIT
pragma solidity 0.8.12;

import "@openzeppelin/contracts/token/ERC721/ERC721.sol";
import "@openzeppelin/contracts/utils/Base64.sol";
import "@openzeppelin/contracts/utils/Strings.sol";

string constant TIER_NAME_0 = "Basic"; string constant TIER_NAME_1 = "Medium";
string constant TIER_NAME_2 = "Premium"; uint256 constant TIER_VALUE_0 = 0.01
ether; uint256 constant TIER_VALUE_1 = 0.02 ether; uint256 constant TIER_VALUE_2
= 0.05 ether;

contract TierNFT is ERC721 { uint256 public totalSupply; mapping(uint256 =>
uint256) public tokenTier;

    constructor(string memory _name, string memory _symbol)
        ERC721(_name, _symbol) {}

    function mint() public payable {
        require(
            msg.value >= TIER_VALUE_0,
            "Not enough value for the minimum Tier"
        );

        uint256 tierId = 0;
        if (msg.value >= TIER_VALUE_2) tierId = 2;
        else if (msg.value >= TIER_VALUE_1) tierId = 1;

        totalSupply++;
        _safeMint(msg.sender, totalSupply);
        tokenTier[totalSupply] = tierId;
    }

    // Create the tokenURI json on the fly without creating files individually
    function tokenURI(uint256 tokenId)
        public
        view
        virtual
        override
        returns (string memory)
    {
        require(_exists(tokenId), "Nonexistent token");

        string memory imageSVG = "PLACEHOLDER FOR SVG IMAGE";

        string memory json = Base64.encode(
            bytes(
                string(
                    abi.encodePacked(
                        '{"name": "', name(), " #", Strings.toString(tokenId),
                        '", "description": "TierNFTs collection",'
                        '"image": "data:image/svg+xml;base64,',Base64.encode(bytes(imageSVG)),
                        '"}'
                    )
                )
            )
        );

        return string(abi.encodePacked("data:application/json;base64,", json));
    }

}
Okay. We've done a bunch of things with our contract, and now we're going to do some scalable vector graphic magic!
Add these lines right above the other constants defined for the tiers:
string constant SVG_START = '<svg xmlns="http://www.w3.org/2000/svg" width="500" height="500" fill="none" font-family="sans-serif"><defs><filter id="A" color-interpolation-filters="sRGB" filterUnits="userSpaceOnUse" height="500" width="500"><feDropShadow dx="1" dy="2" stdDeviation="8" flood-opacity=".67" width="200%" height="200%" /></filter><linearGradient id="B" x1="0" y1="0" x2="15000" y2="0" gradientUnits="userSpaceOnUse"><stop offset=".05" stop-color="#ad00ff" /><stop offset=".23" stop-color="#4e00ec" /><stop offset=".41" stop-color="#ff00f5" /><stop offset=".59" stop-color="#e0e0e0" /><stop offset=".77" stop-color="#ffd810" /><stop offset=".95" stop-color="#ad00ff" /></linearGradient><linearGradient id="C" x1="0" y1="60" x2="0" y2="110" gradientUnits="userSpaceOnUse"><stop stop-color="#d040b8" /><stop offset="1" stop-color="#e0e0e0" /></linearGradient></defs><path fill="url(#B)" d="M0 0h15000v500H0z"><animateTransform attributeName="transform" attributeType="XML" type="translate" from="0 0" to="-14500 0" dur="16s" repeatCount="indefinite" /></path><circle fill="#1d1e20" cx="100" cy="90" r="45" filter="url(#A)" /><text x="101" y="99" text-anchor="middle" class="nftLogo" font-size="32px" fill="url(#C)" filter="url(#A)">D_D<animateTransform attributeName="transform" attributeType="XML" type="rotate" from="0 100 90" to="360 100 90" dur="5s" repeatCount="indefinite" /></text><g font-size="32" fill="#fff" filter="url(#A)"><text x="250" y="280" text-anchor="middle" class="tierName">';
string constant SVG_END = "</text></g></svg>";
// string constant TIER_NAME = ...
Here, we prepared the start and end of our SVG. We can test this out by replacing the code in online svg editor with the start and end values we have provided above.
And now some more modifications. Inside the tokenURI function, right below
// require(...);

string memory tierName = tokenTier[tokenId] == 2
            ? TIER_NAME_2
            : tokenTier[tokenId] == 1
            ? TIER_NAME_1
            : TIER_NAME_0;

        string memory imageSVG = string(
            abi.encodePacked(SVG_START, tierName, SVG_END)
        );

// string memory imageSVG = string(...
For marketplaces to recognize our NFT assets, we need to add some JSON attributes. We created our JSON metadata attributes based on Opensea Metadata Standard, which you can take a look at, if you'd like a deeper understanding.
We'll replace the JSON part to add our attributes:
    '{"name": "',name()," #",Strings.toString(tokenId),
    '", "description": "TierNFTs collection",'
    '"image": "data:image/svg+xml;base64,', Base64.encode(bytes(imageSVG)),
    '","attributes":[{"trait_type": "Tier", "value": "',tierName,
    '" }]}'
We added attributes which are basically some trait types, based on the Metadata Standard.
// SPDX-License-Identifier: MIT
pragma solidity 0.8.12;

import "@openzeppelin/contracts/token/ERC721/ERC721.sol";
import "@openzeppelin/contracts/utils/Base64.sol";
import "@openzeppelin/contracts/utils/Strings.sol";

string constant SVG_START =
'<svg xmlns="http://www.w3.org/2000/svg" width="500" height="500" fill="none" font-family="sans-serif"><defs><filter id="A" color-interpolation-filters="sRGB" filterUnits="userSpaceOnUse" height="500" width="500"><feDropShadow dx="1" dy="2" stdDeviation="8" flood-opacity=".67" width="200%" height="200%" /></filter><linearGradient id="B" x1="0" y1="0" x2="15000" y2="0" gradientUnits="userSpaceOnUse"><stop offset=".05" stop-color="#ad00ff" /><stop offset=".23" stop-color="#4e00ec" /><stop offset=".41" stop-color="#ff00f5" /><stop offset=".59" stop-color="#e0e0e0" /><stop offset=".77" stop-color="#ffd810" /><stop offset=".95" stop-color="#ad00ff" /></linearGradient><linearGradient id="C" x1="0" y1="60" x2="0" y2="110" gradientUnits="userSpaceOnUse"><stop stop-color="#d040b8" /><stop offset="1" stop-color="#e0e0e0" /></linearGradient></defs><path fill="url(#B)" d="M0 0h15000v500H0z"><animateTransform attributeName="transform" attributeType="XML" type="translate" from="0 0" to="-14500 0" dur="16s" repeatCount="indefinite" /></path><circle fill="#1d1e20" cx="100" cy="90" r="45" filter="url(#A)" /><text x="101" y="99" text-anchor="middle" class="nftLogo" font-size="32px" fill="url(#C)" filter="url(#A)">D_D<animateTransform attributeName="transform" attributeType="XML" type="rotate" from="0 100 90" to="360 100 90" dur="5s" repeatCount="indefinite" /></text><g font-size="32" fill="#fff" filter="url(#A)"><text x="250" y="280" text-anchor="middle" class="tierName">';
string constant SVG_END = "</text></g></svg>";

string constant TIER_NAME_0 = "Basic"; string constant TIER_NAME_1 = "Medium";
string constant TIER_NAME_2 = "Premium"; uint256 constant TIER_VALUE_0 = 0.01
ether; uint256 constant TIER_VALUE_1 = 0.02 ether; uint256 constant TIER_VALUE_2
= 0.05 ether;

contract TierNFT is ERC721 {

    uint256 public totalSupply;
    mapping(uint256 => uint256) public tokenTier;

    constructor(string memory _name, string memory _symbol)
        ERC721(_name, _symbol) {}

    function mint() public payable {
        require(
            msg.value >= TIER_VALUE_0,
            "Not enough value for the minimum Tier"
        );

        uint256 tierId = 0;
        if (msg.value >= TIER_VALUE_2) tierId = 2;
        else if (msg.value >= TIER_VALUE_1) tierId = 1;

        totalSupply++;
        _safeMint(msg.sender, totalSupply);
        tokenTier[totalSupply] = tierId;
    }

    // Create the tokenURI json on the fly without creating files individually
    function tokenURI(uint256 tokenId)
        public
        view
        virtual
        override
        returns (string memory)
    {
        require(_exists(tokenId), "Nonexistent token");

        string memory tierName = tokenTier[tokenId] == 2
            ? TIER_NAME_2
            : tokenTier[tokenId] == 1
            ? TIER_NAME_1
            : TIER_NAME_0;

        string memory imageSVG = string(
            abi.encodePacked(SVG_START, tierName, SVG_END)
        );

        string memory json = Base64.encode(
            bytes(
                string(
                    abi.encodePacked(
                        '{"name": "',name()," #",Strings.toString(tokenId),
                        '", "description": "TierNFTs collection",'
                        '"image": "data:image/svg+xml;base64,', Base64.encode(bytes(imageSVG)),
                        '","attributes":[{"trait_type": "Tier", "value": "',tierName,
                        '" }]}'
                    )
                )
            )
        );

        return string(abi.encodePacked("data:application/json;base64,", json));
    }

}
We need to find a way to actually withdraw any funds our contract generates, otherwise they'll get stuck in the contract ... that we created! Let's import
// Place this next to the other imports at the top:
import "@openzeppelin/contracts/access/Ownable.sol";
And inherit
// Modify the contract definition, by adding 'Ownable' at the end of the line:

contract TierNFT is ERC721, Ownable {

		// Our whole contract code here

}
If your phone is ringing, or someone is knocking at your door right now, ignore all of it! Let’s get this withdraw function coded in here!
    // tokenURI function part of the code...

		// Function to withdraw funds from contract
    function withdraw() public onlyOwner {
        // Check that we have funds to withdraw
        uint256 balance = address(this).balance;
        require(balance > 0, "Balance should be > 0");

        // Withdraw funds.
        (bool success, ) = payable(owner()).call{value: balance}("");
        require(success, "Withdraw failed");
    }

		// 'withdraw' will be our last function at the end of the contract

}
// SPDX-License-Identifier: MIT
pragma solidity 0.8.12;

import "@openzeppelin/contracts/token/ERC721/ERC721.sol";
import "@openzeppelin/contracts/access/Ownable.sol";
import "@openzeppelin/contracts/utils/Base64.sol";
import "@openzeppelin/contracts/utils/Strings.sol";

string constant SVG_START =
'<svg xmlns="http://www.w3.org/2000/svg" width="500" height="500" fill="none" font-family="sans-serif"><defs><filter id="A" color-interpolation-filters="sRGB" filterUnits="userSpaceOnUse" height="500" width="500"><feDropShadow dx="1" dy="2" stdDeviation="8" flood-opacity=".67" width="200%" height="200%" /></filter><linearGradient id="B" x1="0" y1="0" x2="15000" y2="0" gradientUnits="userSpaceOnUse"><stop offset=".05" stop-color="#ad00ff" /><stop offset=".23" stop-color="#4e00ec" /><stop offset=".41" stop-color="#ff00f5" /><stop offset=".59" stop-color="#e0e0e0" /><stop offset=".77" stop-color="#ffd810" /><stop offset=".95" stop-color="#ad00ff" /></linearGradient><linearGradient id="C" x1="0" y1="60" x2="0" y2="110" gradientUnits="userSpaceOnUse"><stop stop-color="#d040b8" /><stop offset="1" stop-color="#e0e0e0" /></linearGradient></defs><path fill="url(#B)" d="M0 0h15000v500H0z"><animateTransform attributeName="transform" attributeType="XML" type="translate" from="0 0" to="-14500 0" dur="16s" repeatCount="indefinite" /></path><circle fill="#1d1e20" cx="100" cy="90" r="45" filter="url(#A)" /><text x="101" y="99" text-anchor="middle" class="nftLogo" font-size="32px" fill="url(#C)" filter="url(#A)">D_D<animateTransform attributeName="transform" attributeType="XML" type="rotate" from="0 100 90" to="360 100 90" dur="5s" repeatCount="indefinite" /></text><g font-size="32" fill="#fff" filter="url(#A)"><text x="250" y="280" text-anchor="middle" class="tierName">';
string constant SVG_END = "</text></g></svg>";

string constant TIER_NAME_0 = "Basic"; string constant TIER_NAME_1 = "Medium";
string constant TIER_NAME_2 = "Premium"; uint256 constant TIER_VALUE_0 = 0.01
ether; uint256 constant TIER_VALUE_1 = 0.02 ether; uint256 constant TIER_VALUE_2
= 0.05 ether;

contract TierNFT is ERC721, Ownable { uint256 public totalSupply;
mapping(uint256 => uint256) public tokenTier;

    constructor(string memory _name, string memory _symbol)
        ERC721(_name, _symbol) {}

    function mint() public payable {
        require(
            msg.value >= TIER_VALUE_0,
            "Not enough value for the minimum Tier"
        );

        uint256 tierId = 0;
        if (msg.value >= TIER_VALUE_2) tierId = 2;
        else if (msg.value >= TIER_VALUE_1) tierId = 1;

        totalSupply++;
        _safeMint(msg.sender, totalSupply);
        tokenTier[totalSupply] = tierId;
    }

    // Create the tokenURI json on the fly without creating files individually
    function tokenURI(uint256 tokenId)
        public
        view
        virtual
        override
        returns (string memory)
    {
        require(_exists(tokenId), "Nonexistent token");

        string memory tierName = tokenTier[tokenId] == 2
            ? TIER_NAME_2
            : tokenTier[tokenId] == 1
            ? TIER_NAME_1
            : TIER_NAME_0;

        string memory imageSVG = string(
            abi.encodePacked(SVG_START, tierName, SVG_END)
        );

        string memory json = Base64.encode(
            bytes(
                string(
                    abi.encodePacked(
                        '{"name": "',
                        name(),
                        " #",
                        Strings.toString(tokenId),
                        '", "description": "TierNFTs collection", "image": "data:image/svg+xml;base64,',
                        Base64.encode(bytes(imageSVG)),
                        '","attributes":[{"trait_type": "Tier", "value": "',
                        tierName,
                        '" }]}'
                    )
                )
            )
        );

        return string(abi.encodePacked("data:application/json;base64,", json));
    }

    // Function to withdraw funds from contract
    function withdraw() public onlyOwner {
        // Check that we have funds to withdraw
        uint256 balance = address(this).balance;
        require(balance > 0, "Balance should be > 0");

        // Withdraw funds.
        (bool success, ) = payable(owner()).call{value: balance}("");
        require(success, "Withdraw failed");
    }

}
⌛ Pomodoro? 😊 🌱
We need a script so we can get our smart contract deployed. Let’s write that.
Create a new Javascript file named
const hre = require('hardhat')

/** Set contract and collection name **/
const CONTRACT_NAME = 'TierNFT'
const COLLECTION_NAME = 'TierNFT'
const COLLECTION_SYMBOL = 'Tier'

/** Main deploy function **/
async function main() {
  const contractFactory = await hre.ethers.getContractFactory(CONTRACT_NAME)
  const contract = await contractFactory.deploy(
    COLLECTION_NAME,
    COLLECTION_SYMBOL,
  )

  await contract.waitForDeployment()
  // Print our newly deployed contract address
  console.log("Contract deployed at ", await contract.getAddress())
}
/** Run Main function - Do not change **/
main().catch((error) => {
  console.error(error)
  process.exitCode = 1
})
Now the time has come for us to deploy our smart contract. But before we can do that, we need to modify the code in
require("@nomicfoundation/hardhat-toolbox");
require("dotenv").config();

/** @type import('hardhat/config').HardhatUserConfig */
module.exports = {
  solidity: "0.8.12",
  networks: {
    mumbai: {
      url: "https://rpc-mumbai.maticvigil.com",
      accounts: [process.env.PRIVATE_KEY],
    },
  },
};
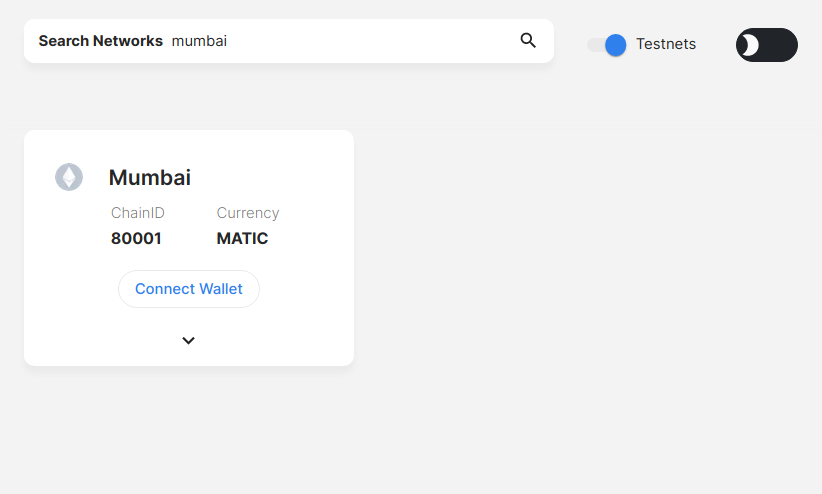
Do you remember in Build a Basic NFT we looked at Ethereum RPC (remote procedure call) node providers? What we are doing is adding the RPC and network configuration to the config file. This will let you, as the deployer, connect your wallet to the testnet. Now we need to add some testnet tokens, so we can actually pay for the deployment of the contract!
This time we're using Polygon Mumbai test network. Head over to the Chainlist page and connect your wallet. Make sure you toggle the testnet button, otherwise no testnets will show up, and search for Mumbai. You will see the testnet network with chainID 80001. Add it to your wallet.
Note: Always make sure to use a separate browser profile, with a separate wallet, holding only testnet tokens, for any tutorials. See our Fundamental on Introduction to web3 Wallets for background on your security, your private keys and your recovery seed phrases!
A testnet is a sandbox environment where developers can test, create and modify functionalities, monitor and simulate a mainnet blockchain's network performance, fix bugs and other network failures without having to worry about breaking a main chain, and paying in real crypto coins to do so! Mainnets cost - testnets generally don't.
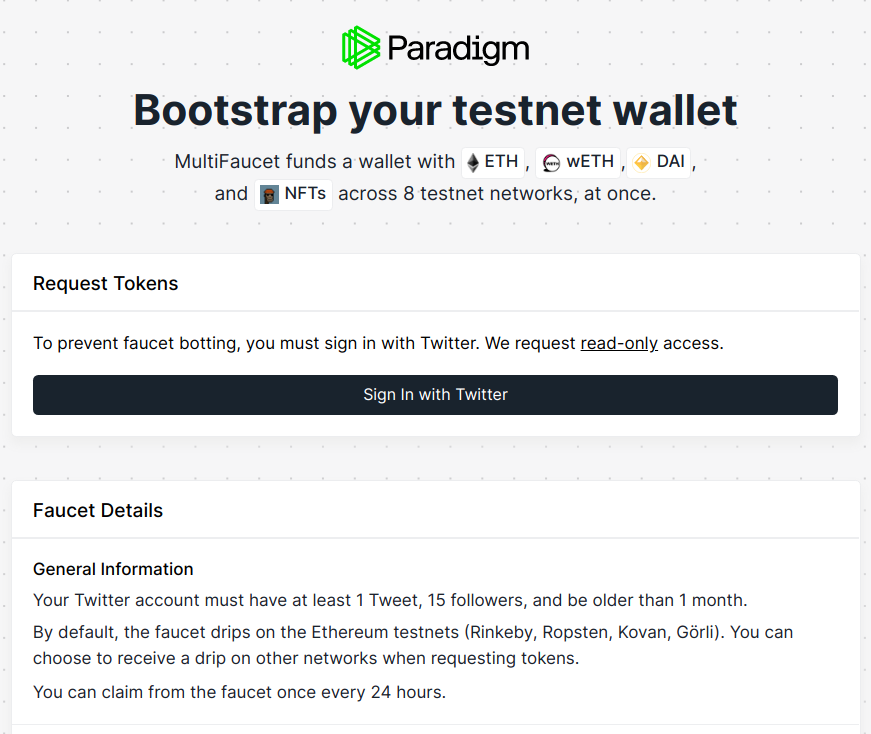
We get testnet tokens from faucets. A faucet is a website, which on request, will drip a small amount of testnet tokens onto your address, and sometimes require completion of small tasks before doing so. some testnet on the wallets. Note: Testnet and mainnet are separate networks. You can't for example send tokens from a testnet to a mainnet. Let's head over and get some on this website. If you complete the required tasks, you can get tokens for multiple testnets.
Take your time to understand the good practices for developers in this section. Before we deploy, we need to add a
For your wallet's private key, the most sensitive data of the project, you need to open Metamask. Click on the three dots next to your Account Name, and then on Account Details, click on Show Private Key. It will ask for your Metamask password, the one you use to log in to your wallet each session, not your seed phrase. It also shows you a warning to 'Never disclose this key'. Confirm and you'll be able to copy your private key. Add your private key into the
PRIVATE_KEY=f8abc629b...
Also, make sure you have a line that says
Now we will run this command to install the
npm install dotenv --save
This takes care of loading our environment variables from the
Remember to always protect your private keys, and your recovery seed phrases to keep your wallet safe and unwanted guests out.
We will deploy our smart contract by using this command:
npx hardhat run scripts/deploy.js --network mumbai
We specify the network where we want the contract to be deployed using the --network option.

Woohoo! Finally we deployed our contract! And got a contract address, which we will need in a bit.
Without a new script we won’t be able to mint any of our NFTs.
The mint function will run three times to mint each different Tier.
The code for what we want is below, but we need a home for it. So let's go back to the
const hre = require("hardhat");

/** Set contract and collection name **/
const CONTRACT_NAME = "TierNFT";
const CONTRACT_ADDRESS = "INSERT_CONTRACT_ADDRESS_HERE";
const VALUE_TIER_0 = "0.01"; // in ethers/matic
const VALUE_TIER_1 = "0.02"; // in ethers/matic
const VALUE_TIER_2 = "0.05"; // in ethers/matic

/** Main deploy function **/
async function main() {
  const contractFactory = await hre.ethers.getContractFactory(CONTRACT_NAME);
  const contract = await contractFactory.attach(CONTRACT_ADDRESS);
  // Print our newly deployed contract address
  console.log("Attached contract ", await contract.getAddress());

  // Call the mint function for Tier 0
  let txn = await contract.mint({
    value: hre.ethers.parseEther(VALUE_TIER_0),
  });
  await txn.wait(); // Wait for the NFT to be minted
  console.log("Minted a Tier 0 NFT!");

  // Call the mint function for Tier 1
  txn = await contract.mint({
    value: hre.ethers.parseEther(VALUE_TIER_1),
  });
  await txn.wait(); // Wait for the NFT to be minted
  console.log("Minted a Tier 1 NFT!");

  // Call the mint function for Tier 2
  txn = await contract.mint({
    value: hre.ethers.parseEther(VALUE_TIER_2),
  });
  await txn.wait(); // Wait for the NFT to be minted
  console.log("Minted a Tier 2 NFT!");

  // Print total number of minted NFTs
  let totalSupply = await contract.totalSupply();
  console.log("Collection's new totalSupply: ", totalSupply);
}

/** Run Main function - Do not change **/
main().catch((error) => {
  console.error(error);
  process.exitCode = 1;
});
⌛ Pomodoro? 😊 🌱
To mint our tier NFTs we will run the following command.
npx hardhat run scripts/mint.js --network mumbai
If we look at our terminal we will see something like this.

You have just minted 3 NFTs - with different Tiers!
Let’s go ahead and view them on the Opensea marketplace. They could take a few minutes to appear, no need to panic 😎 You can search in https://testnets.opensea.io/ for your newly created collection with your contract address, or with the name that you chose.
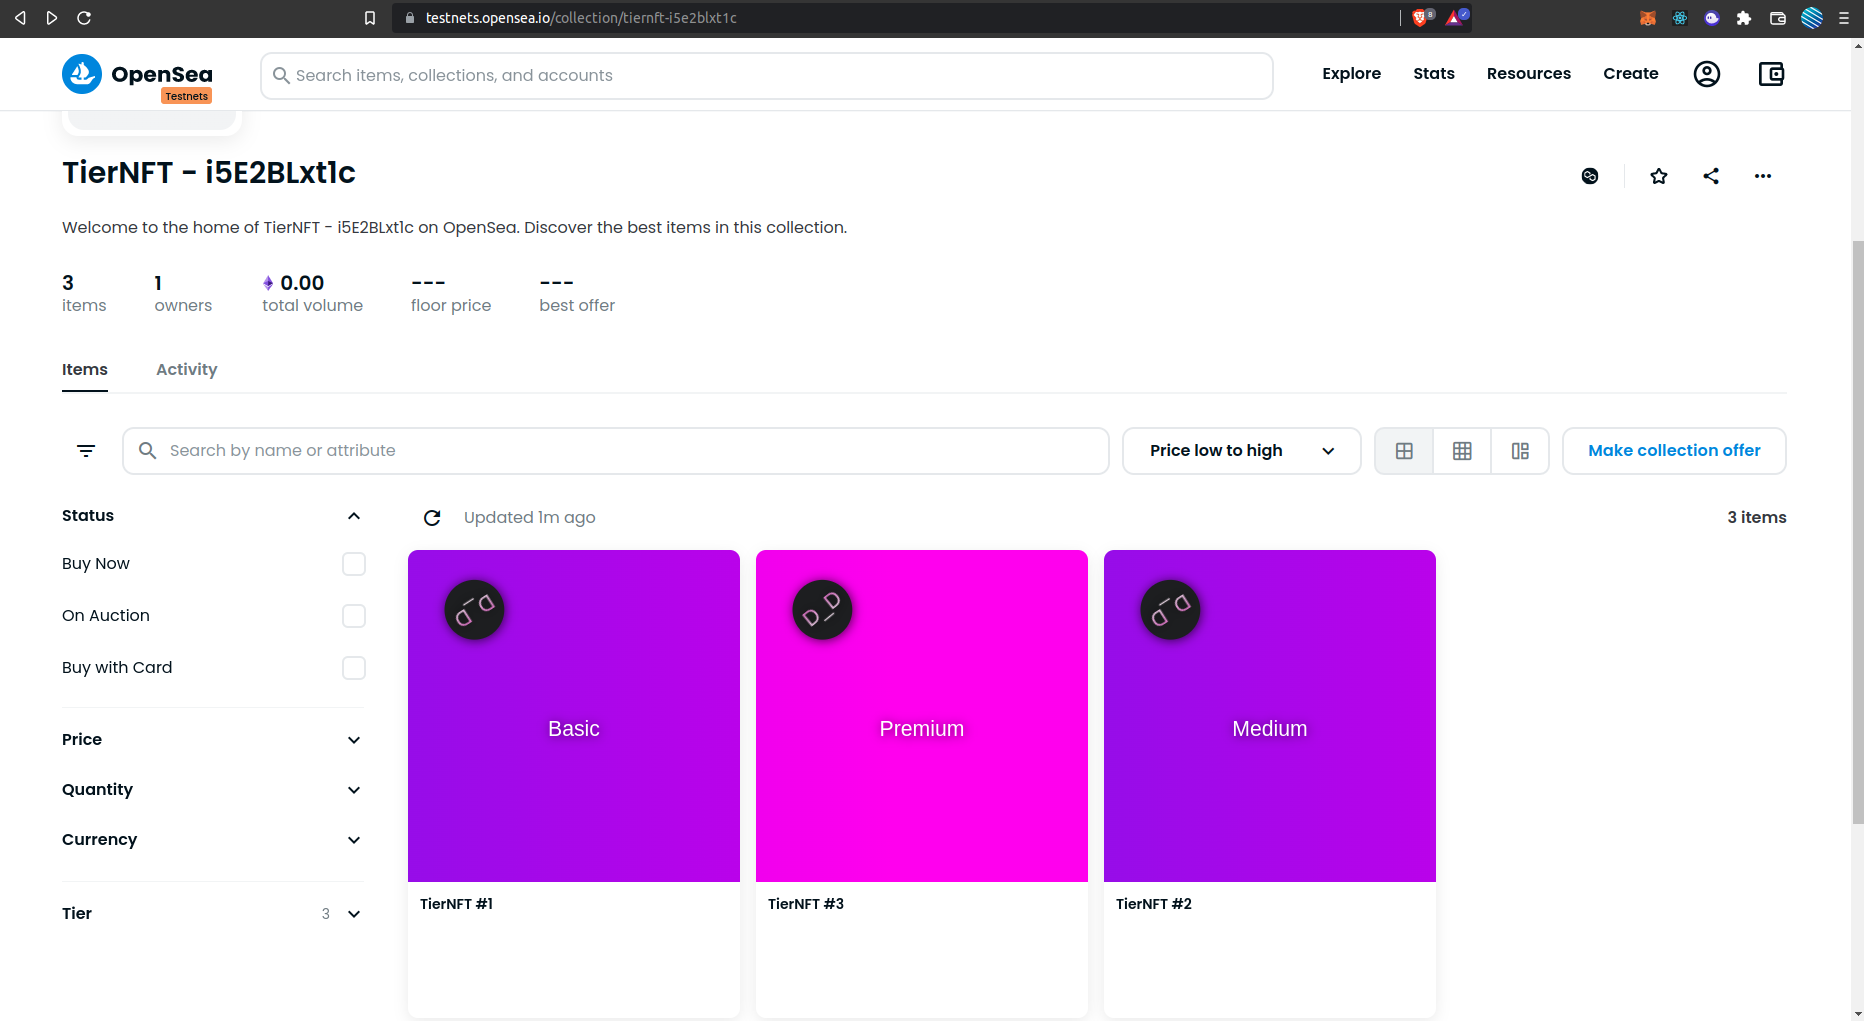
Of course we already have a couple up there, but you will be able to view the three NFTs of your own, which you so diligently minted, the artist that you are!
😊 Now let's see what you have learned along the way with a little quiz 😉
How did you enjoy that? We hope you had fun. And what's next? We're going to bring your dev skills to the level. You ain't seen nothin' yet - we're going testing together. Building culture in web3 is the substrate for the infrastructure we create, and learning to test what we build with real awareness, just like anywhere else, is crucial for creating a safe and sustainable environment. So we're looking forward to seeing you in our Write Automated Tests for your TierNFT project next!
In the mean time, jump into the forum and share your experiences with your peers!